Preference Centres
If GDPR is any indication, we live in a time in email marketing where consumers want to feel more in control, and what better way than to tailor-make what information you send them per their specifications. This is where preference centres are ideal – rather than simply opting out from all communications, you can let them hand pick what they want, to both eliminate the feeling of receiving unwanted emails and hopefully inspire greater loyalty with your brand.
To give you some idea of the benefits, these are the results from two of our different preference centres:
| Client | Total Preferences Selected |
Total Unsubscribed |
Preferences (%) |
| A | 43,787 | 364,073 | 10.74 |
| B | 20,258 | 299,740 | 6.33 |
As you can see, you may be able to retain a good 10% of your disengaging data that you might otherwise lose, so if your email marketing strategy lends itself to some different types of communications, why not consider a preference centre?
If you don’t want the hassle of the development work to set one up, our platform has an inbuilt tool which will simply require you to provide the colour scheme, the settings and the text you want with no coding required. Here’s how it works…
Types of Forms Available
- Sign-Up Form Display
This form is designed to be a public URL which you can direct people to, in order to sign up to something new.
- Update Profile Form Display
This form is designed for people already signed up to you, where they can opt in for certain things (and anything left unticked they are opted out of) as prompted by you in an email.
- Opt-out Form Display
This form is designed for people already signed up to you so that when they unsubscribe they can then be given the option to opt-out from certain things only to see if you can encourage them to stay active, or of course everything if they still prefer.
- If you’re interested, you can also check out our earlier guide to how a simple data capture form also works on our platform.
How the Preference Centre Works
Summary
So, depending on what type of form you are opting in for, you can see how to access the preference centre on the summary page:
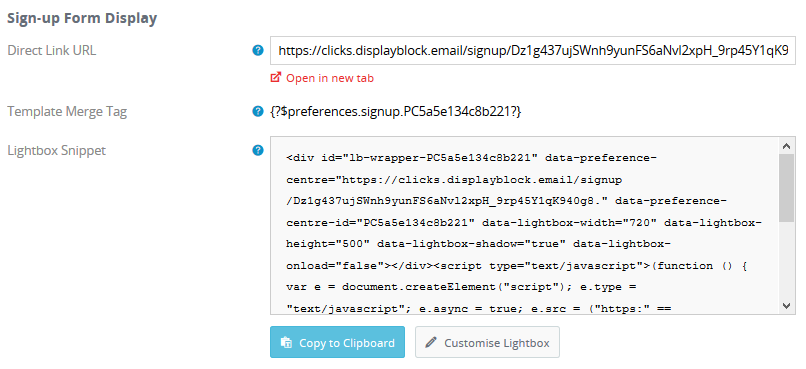
For the Sign-up Form you have the choice of using the Public URL, adding it as a personalised link into an email or sticking it on your website via a Lightbox script.
For the Update Profile Form you can simply add it as a personalised tag via within your campaign sends.
For the Opt-out Form you would connect it to a profile (meaning not all your sends would have this included if you didn’t want to) and then if someone clicks unsubscribe it will appear.
List Selection
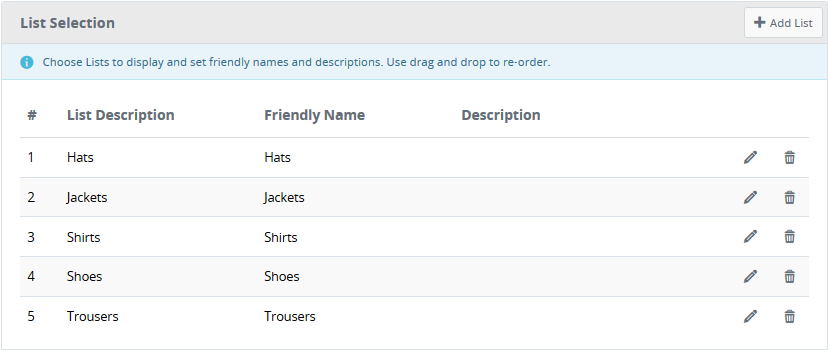
The first step is to plan what preferences you want to capture. Say, for example, you are an apparel shop, you might send regular communications individually on Hats, Jackets, Shirts, Shoes or Trousers. If you create a list for each type in the platform, then people will be added to (or updated on) each list they tick as opted in or opted out depending on what type of form you used. Then you can ensure you remove anyone “list opted-out” from your next send for each type. By simply re-submitting to each form, the preferences can be changed in each list.
On the List Selection tab:
You can force the user to only be able to select one of the boxes or any of them, and can also choose if you want them to appear in one, two or three columns to suit the layout you want.
Then simply Add all the lists you want, and they will be instantly connected to your preference centre form.
Input Fields
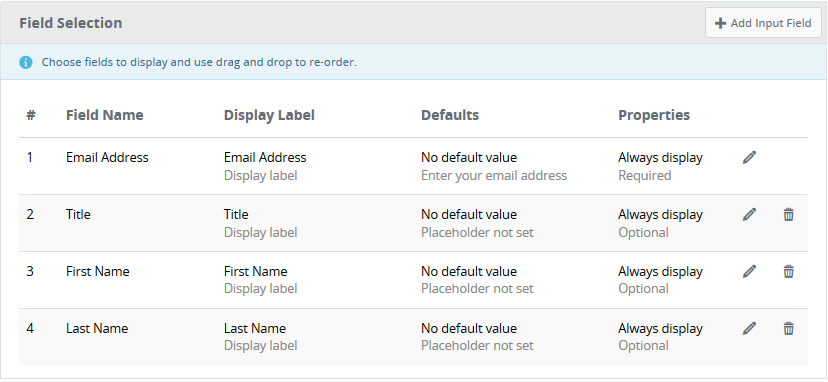
The next tab determines if you wish you include any extra information beyond the types of communications people can opt-in for e.g. Title, First Name, Last Name, DOB etc.
You can update the settings for the Sign-Up Form to Display all selected fields, or to email only. For the Update Profile Form (where the email is known because it would have come directly form an email communication) you can opt to allow all the fields you choose to be updated, or hide them. You can then choose stylistically if you want the field label to be to the left or above the text box.
Then it’s a case of simply choosing which fields you want to include, and having the ability to label them something meaningful to the user.
Content Management
This is where you can pick your colour scheme:
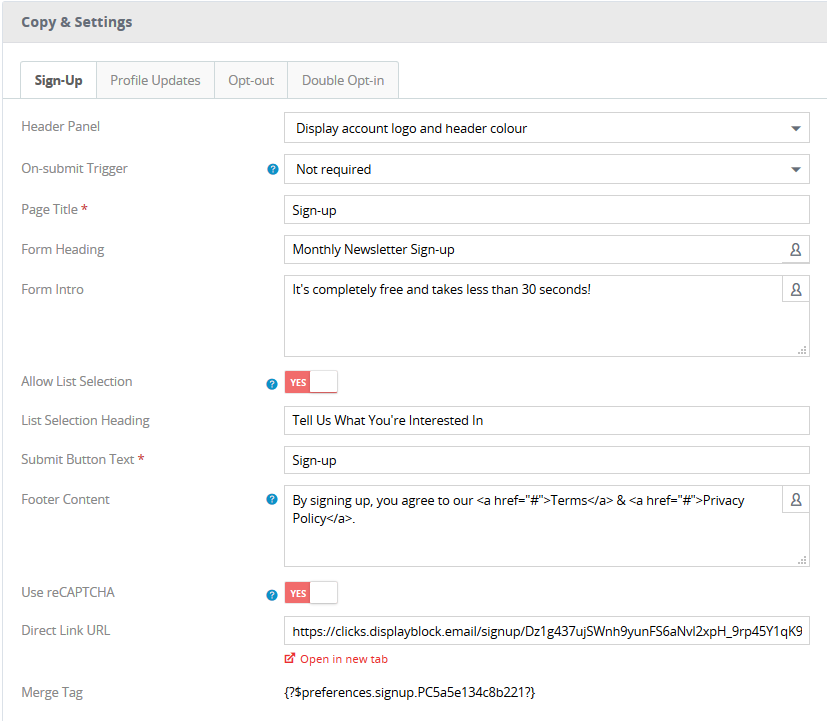
Then choose the various elements you want to appear on your various forms by filling out the relevant tab(s) with:
- Header Panel – to display your logo as it is in the platform
- Page Title
- Form title
- Form Introduction paragraph
- Submit button Label
- Confirmation Page text
- Footer paragraph
- reCAPTCHA (to try to keep the robots at bay)
- An opt-out from everything option
If you do choose to include a “Stop All Communications” option, the system is even designed so that clicking that button clears all the list options, and vice versa, so you can’t have somebody accidentally unsubscribing from everything.
There is a final option for the Sign-Up Form in that you may wish to email a link to those signing up for the first time which will only sign them up once they’ve clicked, also known as Double Opt-in. There is one final tab in this section which lets you fill out the subject line and text you would want to appear in the email, or you can simply disable it if you only need Single Opt-in.
Preview
Finally, you can take a look how all your settings appear to see if you need to make any final tweaks before publishing. You can flick through the three form options and the preview pane will update the form layout to your specifications. You can then fill them out, hit submit and can get some test results showing what would have happened to check your logic.
So, this inbuilt tool should take no more than 15-20 minutes to fill out, test, tweak and publish which is enormously quicker than starting from scratch and your preference lists should be simple to apply to any campaigns being sent from the system so you won’t have to worry about juggling your data outside the system either to make sure you honour the preferences. It’s our preferred way of doing preference centres, so why not see if it works for you.


